Schedulus Supervisor
Schedulus Basics and Overview
If you are interested in using this software, please send an email to schedulus@byu.edu or call the Center for Teaching & Learning at 801-422-8180. You will need to provide your NetID or BYU ID, the name of the department to be added, and department phone number.
The Schedulus website is schedulus.byu.edu.
For initial setup, permissions must be designated first. Click on the Admin tab and select Manage Access Permissions. Under the Access Name heading, three Access Permissions have been created by default: Full, Supervisor, and Employee. Edit an Access Permission by clicking on the desired name, and a pop up will appear.
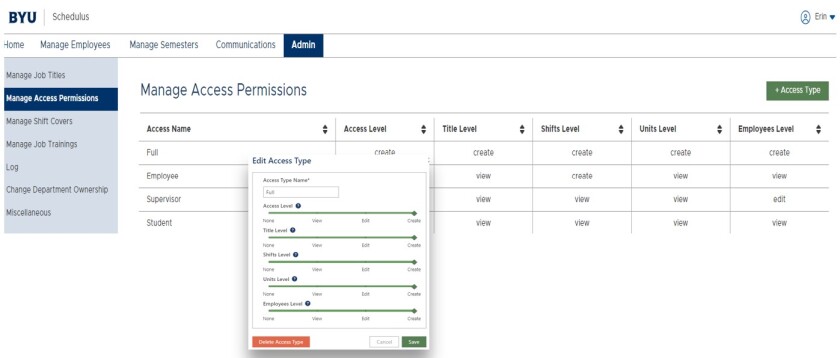
The levels can be adjusted according to preference: Access Level, Title Level, Shifts Level, Units Level, and Employees Level. There are tooltips to explain what each level does and means. Save changes by clicking the green Save button. These changes will then be listed on the Manage Access Permissions page.
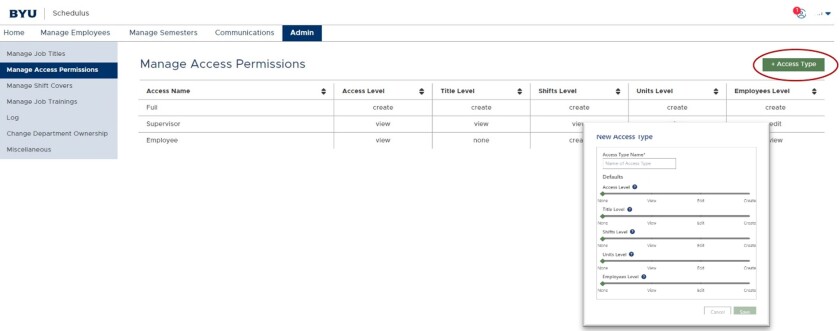
To create a New Access Type, click the green + Access Type button on the far right of the page. Type in a new Access Type Name (required). Adjust the Access Defaults according to preference and save changes by clicking the green Save button. The new Access Name with corresponding permissions will then be listed on the Manage Access Permissions page.
Click on Manage Job Titles, then +Job Title to create all job titles and/or positions that you supervise.

After permissions have been designated and job titles have been created, groups and teams can be set up. These are not required for initial set up, but adding them does help to streamline the process.
Click on the Home tab and select + Group, then enter a Group Name and select Group Owner. Once a group has been set up, click on + Team to add a team(s) to the group.

New employees can be added individually or by importing a CSV. Click on the Manage Employees tab, then + New Employee. You will need either a NetID or a BYU ID to add employees. To add an individual employee, click on the green + New Employee found at the top right of the page. A pop up will appear. Enter the new employee’s NetID or BYU ID in the field provided. Click the Add button and a new pop up box will appear. Note: If the NetID or BYU ID is invalid, an error message will be displayed instead.

If applicable, select whether a student is an international student as defined by the International Office. Add a phone number for the employee if it was not prepopulated. If the student's phone number is unknown, put in any ten digits to add an employee, then either the supervisor or the employee can change this in the future.

Select a group and/or team that the employee will be a part of (optional). The first team of the group will be auto selected. NOTE: If there is not a team added to the group, the supervisor will need to create a team before an employee can be added to it.

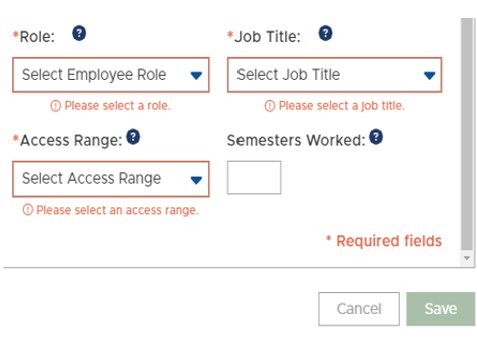
Select one of three options for the employee’s role: Owner, Full-Time Employee, or Student, and select an appropriate job title for the new employee (required). More job titles can be added with different access levels in the Admin tab. Note: When a new department is created, some job titles are included by default. Choose an appropriate Access Range for the new employee (required). The number of semesters worked by the employee can also be entered. Verify that all information is correct and click the green Save button.
After the pop up closes, the new employee will be visible on the Manage Employees page. All employee information can be edited after the employee has been added.
To add employees by using a CSV, click the Import CSV button found towards the top of the page. A pop up will appear. To create a CSV, follow the instructions found in the tooltip or download a template CSV to download and populate.

Once the CSV is ready, choose a file or Drag and Drop the CSV into the given field. Any missing fields or invalid information will display an error message for the user. Verify employees before officially adding them into the respective department. If all information is correct, click on the green Add button, and employees imported from the CSV should be listed on the Manage Employees page.
You can create/edit Groups and Teams and check shift details in the Home tab.
Creating Groups

Select the green + Group button located on the sidebar. A popup will appear with a prompt to Create a New Group. Set the group name, and select a group owner, which defaults to the department owner (required). Save the new group by clicking the green Save button.
Editing Groups

Select a group located on the sidebar, then click the edit icon next to the group name. A popup will appear with a prompt to Edit Group. Edit the group name and/or group owner, which defaults to the department owner. Save changes by clicking the green Save button.
In the Manage Employees tab, supervisors can proxy as a student, register employees for shifts, add employees (with a CSV or manually), and edit employee information.
Proxy
To proxy as a student employee, select an employee name from the list on the Manage Employees page. An Employee Information pop up will appear. Select the green Proxy button.

When proxying as a student employee, you can view the student's class schedule and work schedule. If the student has not imported their class schedule, click on the green Import Current Classes and/or Import Future Classes button. Click the green Clear button at the top right of the page when finished proxying as a student employee.
Register for Shift
Click on the green Register for Shift button that is to the left of the green Proxy button to assign a student employee to a shift.
Add Employees with CSV
You can batch import employees in a CSV or add employees individually. To use a CSV, navigate to the Import CSV button found towards the top right of the page. A pop up will appear.

Supervisors can create their own CSV, following the instructions found in the tooltip, or you can download a template CSV and populate a CSV that way. Once the CSV is ready, choose a file or Drag and Drop the CSV into the given field. Any missing fields or invalid information will display an error message.
Double check the added employees before officially adding the employees into the department.
Once the employee information is correct, click on the Add button. The Manage Employees page should show employees that were imported from the CSV.
Add Employees Manually

Navigate to the green + New Employee button towards the top right of the page. A pop up will appear.
Insert the new employee’s BYU ID or NetID in the given fields and hit the Add button at the bottom of the popup (if the the BYU ID or NetID is invalid, an error message will appear). The new pop up should appear with some prepopulated information. All information can be changed unless stated otherwise.

Select whether or not a student is an international student as defined by the International Office. Fill in a phone number of the employee if it was not pre-populated. If the employee's phone number is not known, any ten-digit number will work, but this number should be updated later when the correct information is received.
If applicable, select a group that the employee will be a part of. The first team of the group will be auto-selected. Create a team before adding the employee to a group/team.
Select one of three options for the employee’s role: Owner, Full-Time Employee, or Student. Next, select a job title for the new employee. More job titles and access levels can be added and adjusted according to supervisor preference.
Choose an appropriate Access Range for the new employee, and enter the amount of semesters worked by the employee.
Verify that the information is correct and hit the Save button. All added employees will be visible on the Manage Employees page.
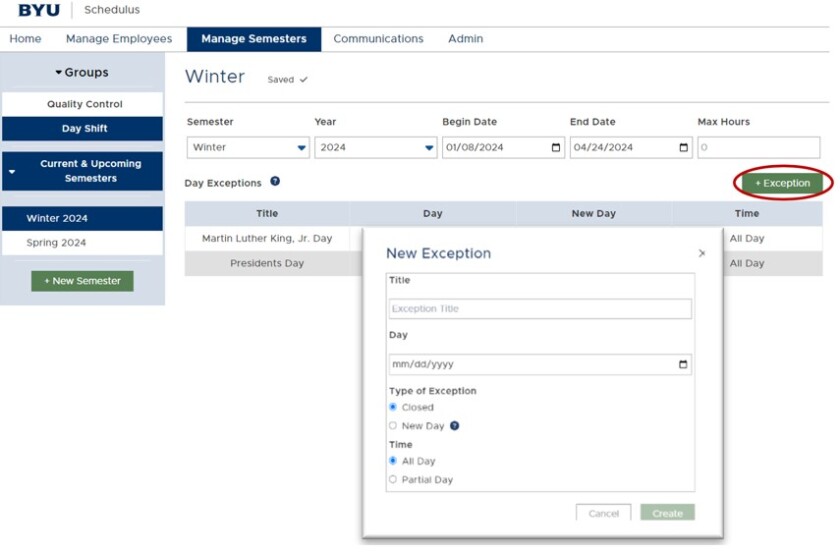
Once the groups, teams and employees have been set, shifts can be created in the Manage Semesters tab. Groups and semesters can be selected by using the menu on the left side of the page. The current semester should be displayed by default. If applicable, set the appropriate Max Hours for the semester. Exceptions can be added with the green + Exception button. Set a title and select the exception date (required).
Each of the three toggle buttons on the top-right of the page are optional. Count Semester can be set so the current semester will count towards the total amount of semesters an employee has worked. Open Registration allows students to register and unregister for shifts on the student side. Priority Registration can be set for students to sign up for shifts on a certain date dependent upon the number of semesters they have worked. If Priority Registration is on, enter these Priority Dates underneath the Priority Registration button. Click on + Priority Date, and a pop up will appear. Select an appropriate date and semesters worked.

Create shifts by navigating to the green + New Shifts
button. Click this button, and a pop up will appear.
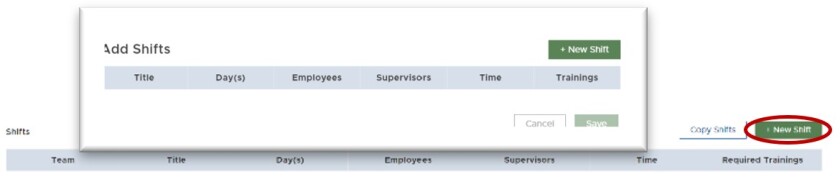
In the pop up, click on + New Shift, then select a team using the dropdown menu which should appear. Once a team is selected, there will be a New Shift pop up. Assign a shift name (required).

Enter Shift Name and select a date that the shift will start on. The date defaults to the start of the semester, or if the semester has already started, it will default to today’s date. Select a start and an end time (these will default to 8:00 am to 12:00 pm). Select whether the shift will repeat Never (one time occurring shift), repeat Weekly, or repeat Monthly. The start date defaults to the selected date and the end date defaults to the end of the semester.
There are two options for monthly repeating: Each or On the. When you select Each, you can choose which day of the month the shift will repeat on. On the has six options: First, Second, Third, Fourth, Fifth, and/or Last day of the week the shift will repeat on. By default, the Start Repeat and the End Repeat default to the first and last day of the semester respectively. You can change the start and end repeat day if needed.
Indicate the amount of positions available for employees and supervisors (required). You can either manually select which employees/supervisors will work on this shift, or you can indicate the amount of available positions and allow for students to register for these shifts on their own according to their own schedule.
This step can be done by toggling Open Registration. NOTE: When an employee who is marked as “International” is selected to be part of a shift, a warning will appear to let supervisors know and to keep in mind that the employee cannot go over their hours and to coordinate with said employee and the International Office.
Once an employee is added to the shift they can be removed by either clicking on the “-” button next to their name, or by editing the shift, or by toggling Open Registration, which allows for the employee to remove themselves from the shift if there is a scheduling conflict.
Review the newly created shift and hit the green button labeled Create Shift (required). This new shift should appear in the previous popup. You can create more shifts as needed, following the same steps as before. Any new shifts will show in the popup as a list to be added.
Once you have created the desired amount of shifts, click the green Save button.
The saved shifts will now appear in the Shifts table at the bottom of the Manage Semesters Page.
In the Communications tab, you can send individual, group, or team emails to the employees you supervise. Emails can be sent according to job title as well.

Click on the file box icon to archive a conversation. To view your archived items, along with deleted items, click the Inbox dropdown.

The department supervisor can navigate to the Admin tab to review or edit the following categories: Manage Job Titles, Manage Access Permissions, Manage Shift Covers, Manage Job Trainings, Log, Change Department Ownership, and Miscellaneous.
Manage Job Titles
By default a newly created department comes with two job titles: Supervisor and Team Member. You can create new job titles by clicking the green + Job Title button (optional).

A pop up will appear with the following required fields: Job Title and Access Level. New job titles will appear in the list in the Manage Job Titles tab. You can adjust or create new access levels in the Manage Access Permissions tab. The Job Description field is optional.

Manage Access Permissions
By default three access permissions are created: Full, Supervisor and Employee. Create and name a new access permission by clicking the green +Access Type button. You can edit or create new access permissions by clicking on the desired permission, and a pop up will appear. These are the levels of each access type: Access Level, Title Level, Shifts Level, Units Level, and Employees Level. There are tooltips that explain what each level does and means. Any adjustments to these levels are shown on the Manage Access Permissions page.
Manage Shift Covers
This tab has three dropdown menus. You can approve or deny shift covers in the Employees Requesting Covers dropdown. A history of this activity is shown in the Covered Shifts and Denied Shifts dropdowns.
Manage Job Trainings
Any necessary trainings needed for shifts can be added by clicking the green button labeled +Job Training.
A pop up will appear and you can enter the name and description of the training.
Log
The Log tab shows the shift registration history for all employees in your department.
Change Department Ownership
You will need the net ID for the new department owner to change ownership.
Miscellaneous
In this tab, you can manually increase semesters worked by all employees in your department.