Creating a Section
(current as of version 1.0.0.X)
This section teaches how to create a new section for a course, with corresponding course details.
1. Sign into the tbl.byu.edu home page.
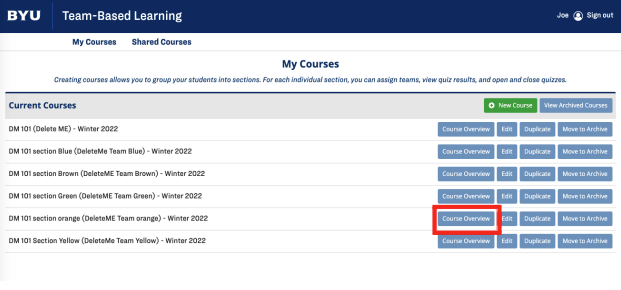
2. Click on “Course Overview” for the course you want to add a section to.

3. On the course page, click the green button labeled “New Section” in the left side bar.

4. A popup-window will appear. Type the information (section number, TA, time, and day of the week) for the section. Click "Save" at the bottom of the popup.

The newly created section will appear in the section list in the left sidebar.

Adding Students to a Section
Here you will learn how to add students to a section that has already been created, and how to group students into teams. Teams may also self-form. Note: Students will also be added to a course if you distribute a quiz URL or quiz ID to them.
1. To add students to a section, click the "View" button next to the desired section.

2. After selecting a section to view, click the "Students" button located next to the "Quizzes" and "Teams" options.

3. Add students to your section by searching for their net ID in the search bar under "Available Students."

4. After finding the students you'd like to add, select "Add to Section."

5. When you've successfully added a student, their name will be displayed under “Students in this Section.” If a student needs to be removed, select the “Remove from Section” button to the right of their name.

Creating and Editing Teams
Once students have been added to the section, teams can be created. This section will go over how to create and edit teams.
Creating a Team
1. Select the "Teams" portion of the desired section.

2. Select the "New Team" button in the upper right corner.

3. Type the team name and add desired students by clicking the add button next to their name from the list of available students in the section.

4. Select a team captain from the dropdown menu and click "Save."

5. Repeat the process to create other teams.
Editing a Team
1. To edit teams, return to the main "Teams" screen.
2. Find the desired team and select "Edit" on the right hand side.

3. The team name, members, and team captain can be edited from this screen. Then click "Finish" to save.

4. To remove a team member, find their name on the list of team members and select “Remove” to the right of their name. Then click “Finish” to save.

5. To add a student to an existing team, find their name in the list of available students on the right hand side, or search for them using their NetID, name or email. Then select “Add.” then click “Finish” to save.

6. To change the Team Captain, select the drop-down menu next to Team Captain and select the desired student’s name. Then click “Finish” to save.
