Exam Questions
-
Toggle ItemQuestion Types
To add a question to an exam, click the Exams tab and click on the exam name.

Click on New question and a dialog box will appear. Select the Type of question from the dropdown menu.

There are several options when creating an exam question.
Note: If the instructor has already entered question text and decides to switch to a different question type, the question text will be saved and transferred to the other type selected. This is true for all question types except fill-in-the-blank. However, any response choices will not transfer to the new question type.
Add Table to Question
1. Click the grid icon to add a table in the question text box.
2. The Table Properties dialog window appears. Enter the number of rows and columns for the table to have. Change other table properties as desired. Click OK when finished.

3. The table appears in the text box. Right click anywhere in the table to paste text, edit the number of cells, rows, or columns, delete the table, or edit table properties.
True/False
1. Select True/False from the Type drop down menu.
2. The dialog window will automatically adjust to true/false format. Enter the question text and check either T or F to indicate the correct answer.

3. Adjust the points for each response in the Points column.
4. Add feedback (optional) by selecting either Feedback on question or Feedback for student answer. There are two types of answer feedback to choose from in the dropdown:
- Different for each: to enter separate feedback entries for each possible response. Students view the feedback entry according to how they responded to the question.
- Same for all: to enter one feedback entry that appears to students regardless of the answer they select.
5. Select any additional options desired for the question:
- Make this question extra credit: Extra credit questions will not change the total points possible for the exam. Any questions marked as extra credit cannot negatively impact students' grades.
- Any response gets full credit: If selected, students who answer the question will receive full credit, even if they answered the question wrong. This is a helpful tool for awarding participation points.
- Add 'Explain your answer' box for this question: An 'Explain your answer' box will be provided to students when answering the question. Instructors can view explanations and change scores in the Scoring tab or in the Grader.
6. Click Save.
Multiple Choice
1. Select Multiple choice from the Type drop down menu.
2. The dialog window will automatically adjust to multiple choice format. Enter the question text.

3. Enter the choices for the question and check the correct choice’s letter to the left.
4. Adjust the points earned for the correct answer.
5. Add feedback (optional) by selecting either Feedback on question or Feedback for student answer. There are three types of answer feedback to choose from in the dropdown:
- Correct/Incorrect: to enter two different feedback entries. The correct entry appears to students if they enter the correct answer and the incorrect entry appears to students if they enter an incorrect answer.
- Different for each: to enter separate feedback entries for each possible response. Students view the feedback entry according to how they responded to the question.
- Same for All: to enter one feedback entry that appears to students regardless of the answer they select.
6. Check any additional options desired for the question.
- Make this question extra credit: Extra credit questions will not change the total points possible for the exam. Any questions marked as extra credit cannot negatively impact students' grades.
- Any response gets full credit: If selected, students who answer the question will receive full credit, even if they answered the question wrong. This is a helpful tool for awarding participation points.
- Add 'Explain your answer' box for this question: An 'Explain your answer' box will be provided to students when answering the question. Instructors can view explanations and change scores in the Scoring tab or the Grader.
7. Click Save.
Multiple Response
1. Select Multiple response from the Type drop down menu.

2. The dialog window will automatically adjust to multiple response format. Enter the question text.
3. Enter the choices for the question and check the correct choices’ letters to the left. Additional choices can be added by clicking Add Choice.4. Adjust the points earned for correct answers. The points possible for a response can be a negative value. Negative point values will not change the points possible for the question and the question can never be worth less than zero points.
The ability to award negative points for a response is most helpful for multiple response questions. This allows instructors to penalize students for selecting incorrect answers, thus taking away the possibility of students receiving full credit by simply checking all response options. This method is recommended if the option All answers must be correct for credit is not checked in the Options menu.
5. Add feedback (optional) by selecting either Feedback on question or Feedback for student answer. There are three types of answer feedback to choose from in the dropdown:
- Correct/Incorrect: to enter two different feedback entries. The correct entry appears to students if they enter the correct answer and the incorrect entry appears to students if they enter an incorrect answer.
- Different for each: to enter separate feedback entries for each possible response. Students view the feedback entry according to how they responded to the question.
- Same for All: to enter one feedback entry that appears to students regardless of the answer they select.
6. Check any additional options desired for the question.
- Make this question extra credit: Extra credit questions will not change the total points possible for the exam. Any questions marked as extra credit cannot negatively impact students' grades.
- Any response gets full credit: If selected, students who answer the question will receive full credit, even if they answered the question wrong. This is a helpful tool for awarding participation points.
- All answers must be correct for full credit: All correct responses must be selected and no incorrect responses can be selected to get credit for this question. If this option is not checked it is recommended that incorrect responses are awarded negative point values, thus taking away the possibility of students receiving full credit by simply checking all response options.
- Add 'Explain your answer' box for this question: An 'Explain your answer' box will be provided to students when answering the question. Instructors can view explanations and change scores in the Scoring tab or the Grader.
- Prompt students to enter ___ answers: to prompt students to select the correct number of responses. For example, text will appear when students take the exam to "Select 4 answers."
7. Click Save.
Open Response
1. Select Open response from the Type drop down menu.
Note: Open responses questions are manually graded questions that require an instructor or TA to assign grades. Students' exam grades DO NOT appear in BYU Grades after exam completion until an instructor or TA grades manually graded questions in an exam.
2. The dialog window will automatically adjust to open response format. Enter the question text and the points possible.
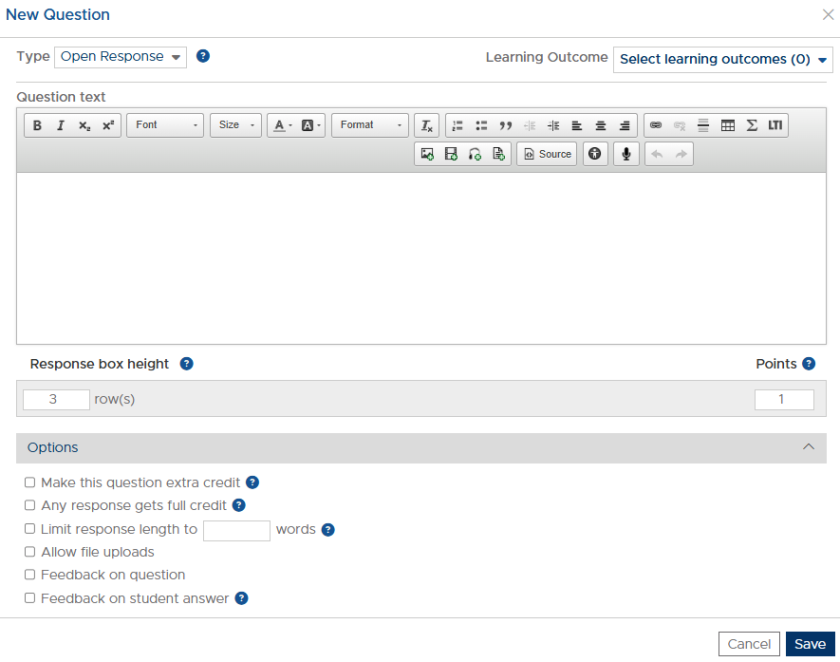
This is not a computer-scored question. The exam score will not be added to BYU Grades until instructors have scored open response questions. Instructors can score open response questions in the Scoring tab that appears when the exam has been published, or the Grader.
3. Check any additional options desired for the question.
- Make this question extra credit: Extra credit questions will not change the total points possible for the exam. Any questions marked as extra credit cannot negatively impact students' grades.
- Any response gets full credit: If selected, students who answer the question will receive full credit, even if they answered the question wrong. This is a helpful tool for awarding participation points.
- Limit response length to ___ words: This will limit the number of words students can use in a response to the amount you enter here.
- Allow file uploads: Students will have an option to submit a file for the question.
- Add feedback: Select either Feedback on question or generalized Feedback for student answer.
4. Click Save.
Fill in the Blank
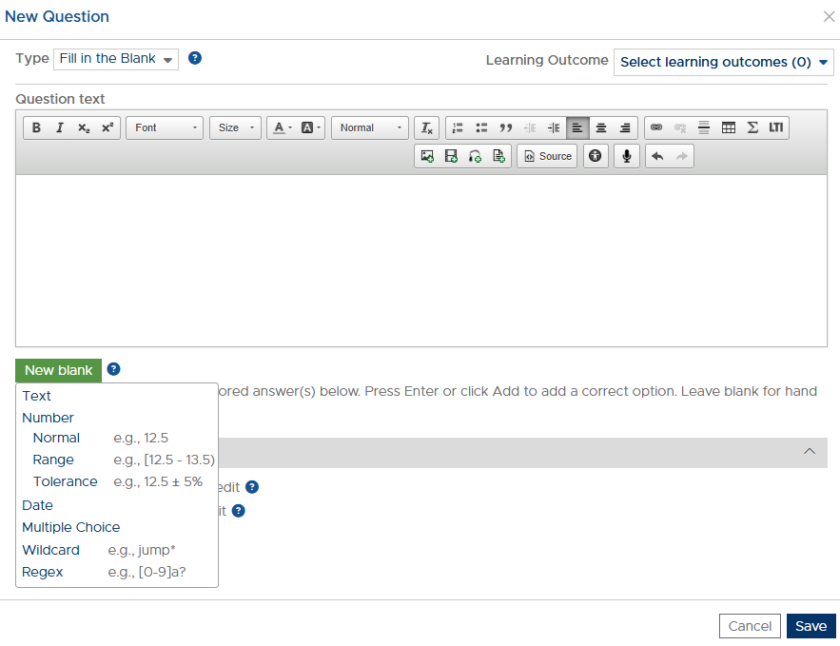
1. Select Fill in the blank from the Type drop down menu.
2. The dialog window automatically adjusts to Fill in the Blank format. Type in the question text and click New Blank.
3. A drop down menu will appear. Select the type of response from the menu.
Note: The type cannot be changed after the question is saved. For example, if a fill in the blank question is originally saved as a number type it cannot be changed to a text type later on.
There are six response types to improve computer-scored answer matching:
- Text: This includes regular phrases or words. Every possible combination of the answer needs to be entered to ensure correct computer-scored answer matching. Ex: cougar, Cougar
- Number: This includes any numerical entries. There are three number types: Normal, Range, Tolerance.
- Date: to enter a specific date format as the correct response.
- Multiple Choice: Students will have a dropdown with choices in this blank to choose from. The instructor needs to add the choices in the question answer.
- Wildcard: to enter * or ? into the correct response to enhance answer matching. For example, if 123??? is entered as the correct response, "123" followed by any combination of three numbers will be considered correct. Ex: 123456 or 123789.
Note: Be sure to only enter * or ? into the wildcard option. If entered into any other fill in the blank type, students must include those characters in their answer to receive credit. - Regex: Regex is an abbreviation for "regular expression" and is a more complex version of wildcard. This allows you to enter a wide variety of characters to create sequences that enhance answer matching. For example, a regex such as ^gr[ae]y$ will match either "gray" or "grey". Students' responses must match anything that begins with ^ and ends with $.
Note: Leaving the textbox blank allows an instructor to manually score the question, which can be done in the Scoring tab that appears when the exam has been published, or in the Grader.
4. Enter the points possible in the Points column.
5. Select Feedback on question for a student answer(s) if desired (optional). If selected, there are two types of answer feedback to choose from in the dropdown:
- Same for all: to enter one feedback entry that appears to students regardless of the answer they select.
- Correct/Incorrect: to enter two different feedback entries. The correct entry appears to students if they enter the correct answer and the incorrect entry appears to students if they enter an incorrect answer.
6. Check any additional options if desired for the question.
- Make this question extra credit: Extra credit questions will not change the total points possible for the exam. Any questions marked as extra credit cannot negatively impact students' grades.
- Any response gets full credit: If selected, students who answer the question will receive full credit, even if they answered the question wrong. This is a helpful tool for awarding participation points.
- Exclude punctuation: If selected, punctuation at the end of students' responses is not recognized. For example, if a student enters a period after their answer because it is at the end of a sentence, the period is excluded when the question is computer-scored. However, punctuation entered in the correct response is not excluded. Meaning that if instructors enter punctuation into the correct response, students must include the punctuation to receive credit for the question. Excluded punctuation includes: periods, commas, question marks, exclamation points, colons, and semicolons.
Note: This option is checked by default. - Case sensitive: If this option is selected, student responses will be case sensitive.
Note: This option should not be used with regex or date fill in the blank question types. - Feedback on question: Generalized feedback for students.
7. Click Save.
Matching
1. Select Matching from the Type drop down menu.
2. The dialog window will automatically adjust to matching format. Enter the question text.

3. Enter the column titles, prompts, and matching choices. The correct match should be entered in the same row as the prompt.
Click New prompt to create an additional match choice.
Click Edit match list to reorder match options, create additional match options with no connected prompt (distractors), and delete match options.
4. Enter the points possible for each response in the Points column. The total points possible for the question can be found at the bottom of the Points column.
5. Check any additional options desired for the question.
- Sort match column in "option" order: This allows instructors to sort the Match column in custom, random, ascending, or descending order.
- Make this question extra credit: Extra credit questions will not change the total points possible for the exam. Any questions marked as extra credit cannot negatively impact students' grades.
- Any response gets full credit: If selected, students who answer the question will receive full credit, even if they answered the question wrong. This is a helpful tool for participation points.
- Students will see match in column in _____ order: These ordering options are also available in Edit match list: Random, Ascending, or Descending. Random is selected by default in both locations. When ordering preference is changed in one location, it will change in the other location as well.
- Feedback on question: A feedback text box appears if this option is checked. This type of feedback is generalized information that appears to all students.
6. Click Save.
Date
1. Select Date from the Type drop down menu.
2. The dialog window will automatically adjust to date format. Enter the question text.

3. Enter the answer(s) into the Computer-scored answer(s) display. Values must be entered numerically. For additional answers, click Add date. Additional dates can be deleted by clicking the delete icon.
4. The point value of the question can be edited in the Points column.
5. Leave feedback (optional) by selecting either Feedback on question or Feedback for student answer. There are two types of student answer feedback to choose from in the dropdown:
- Same for All: to enter one feedback entry that appears to students regardless of the answer they select.
- Correct/Incorrect: to enter two different feedback entries. The correct entry appears to students if they enter the correct answer and the incorrect entry appears to students if they enter an incorrect answer.
6. Check any additional options desired for the question.
- Make this question extra credit: Extra credit questions will not change the total points possible for the exam. Any questions marked as extra credit cannot negatively impact students' grades.
- Any response gets full credit: If selected, students who answer the question will receive full credit, even if they answered the question wrong. This is a helpful tool for awarding participation points.
- Add 'Explain your answer' box for this question: An 'Explain your answer' box will be provided to students when answering the question. Instructors can view explanations and change scores in the Scoring tab or the Grader.
7. Click Save.
Short Text
1. Select Short Text from the Type drop down menu.
2. The dialog window will automatically adjust to short text format. Enter the question text.

3. Select the desired type of short text answer from the Computer-scored answer(s) dropdown menu provided. Options available are Text (ex: Hello World), Wildcard (ex: jump*), and Regex (ex: [0-9]|a*).
4. Enter the answer(s) in the Answer textbox provided, and click Add answer for additional short text answers. Answers can be deleted by clicking the delete icon.
5. The point value of the question can be edited in the Points column.
6. Check any additional options desired for the question.
- Make this question extra credit: Extra credit questions will not change the total points possible for the exam. Any questions marked as extra credit cannot negatively impact students' grades.
- Any response gets full credit: If selected, students who answer the question will receive full credit, even if they answered the question wrong. This is a helpful tool for awarding participation points.
- Add 'Explain your answer' box for this question: An 'Explain your answer' box will be provided to students when answering the question. Instructors can view explanations and change scores in the Scoring tab or the Grader.
- Exclude punctuation: If selected, punctuation at the end of students' responses is not recognized. For example, if a student enters a period after their answer, the period is excluded when the question is computer-scored. However, punctuation entered in the correct response is not excluded. Meaning that if instructors enter punctuation into the correct response, students must include the punctuation to receive credit for the question. Excluded punctuation includes: periods, commas, question marks, exclamation points, colons, and semicolons.
Note: This option is checked by default. - Case sensitive: If this option is selected, student responses will be case sensitive.
- Feedback: Leave generalized feedback on question or feedback for student answer. There are two types of student answer feedback to choose from in the dropdown:
- Same for All: to enter one feedback entry that appears to students regardless of the answer they select.
- Correct/Incorrect: to enter two different feedback entries. The correct entry appears to students if they enter the correct answer and the incorrect entry appears to students if they enter an incorrect answer.
7. Click Save.
Number
1. Select Numeric from the Type drop down menu.
2. The dialog window will automatically adjust to numeric format. Enter the question text.

3. Under the Computer-scored answer(s) section, select the desired type of number answer from the dropdown menu. The options available are Normal (ex.: 12.5), Range (ex.: 12.5 - 13.15), and Tolerance (ex.: 15.5 +/- 5%). Enter the answer(s) in the textbox provided. Click Add number for additional textboxes. Additional answers can be deleted by clicking the delete icon.
4. The point value of the question can be edited in the Points column.
5. Check any additional options desired for the question.
- Make this question extra credit: Extra credit questions will not change the total points possible for the exam. Any questions marked as extra credit cannot negatively impact students' grades.
- Any response gets full credit: If selected, students who answer the question will receive full credit, even if they answered the question wrong. This is a helpful tool for awarding participation points.
- Add 'Explain your answer' box for this question: An 'Explain your answer' box will be provided to students when answering the question. Instructors can view explanations and change scores in the Scoring tab or the Grader.
- Feedback: Leave feedback on question or feedback for student answer. There are two types of student answer feedback to choose from in the dropdown:
- Same for All: to enter generalized feedback that appears to students regardless of the answer they select.
- Correct/Incorrect: to enter two different feedback entries. The correct entry appears to students if they enter the correct answer and the incorrect entry appears to students if they enter an incorrect answer.
6. Click Save.
Hot Spot
A Hot Spot question is an image based question where the student is required to select a location on the image to answer or match the question.
1. Select Hot Spot from the Type drop down menu.
2. The dialog window will automatically adjust to hot spot format. Enter the question text.

3. To select an image to use for a Hot Spot type, select Upload Hot Spot Image.
4. Select an image from Learning Suite Files or upload a new image.
- To select an image from Learning Suite Files, simply select the image in the file list.
- To upload a new file: select Upload file, then select Choose Files, then use the file finder to locate and select the image. The instructor can add a description to the file (the file will be uploaded to Learning Suite Files). Select the location to save it to.
Note: For images with duplicate names, selecting Replace Existing File will delete the older version of the picture automatically. Select to rename the file as it is uploaded. - When finished with selections, select Save to go back to Files, then click Insert.
5. Now that the image is uploaded, the instructor will need to add all the possible selection areas on the image. Click Edit Hot Spots or click on the image to edit. Use Zoom in and out if needed for the image. Follow the steps below to create a selection.

6. Using the Draw tool bar options, select the desired hot spot location on the image. Hover over the options on the tool bar for descriptions.
- Click and Drag Rectangle: Click, hold, and drag the mouse to create a rectangle hot spot on the image.
- Click and Drag Oval: Click, hold, and drag the mouse to create an oval hot spot on the image.
- Draw Area (pencil icon): Click and drag the mouse to create a free-draw selection.
- Select Area by Color: Select the area in an image based on the color.
7. Use the Edit toolbar options to make adjustments or corrections to selected hotspot area(s).
- Add Point to Selected Area: Add points to a preexisting selection shape or line.
- Move Area: Click and drag a selected area to a new location on the image.
- Copy Area: Click on a selection to create a copy.
- Undo/Redo: Click to undo the last thing on the image or click to redo the last undo.
8. Instructors can add additional Hotspot areas to the image. For example, if the student needs to select where the eye on a face is, the instructor can add an area for both the right and the left eye. Both will be valid locations for that selection. As long as the main selection is highlighted in green, additional areas on the image can be selected.
9. Click on Add Hot Spot Area to create a separate hot spot selection on the same image.
10. Click OK to save and exit.
11. After hot spots are created, prompts need to be created and matched to the hot spot area. To add a prompt, select New prompt.

12. In the prompt text box, write the text that will be shown as the question prompt. In the Match drop down to the right of the Prompt, select the area from the drop down that is the correct/matching answer for the prompt. A list of created Selection Areas that are not paired with a correct/matching answer are listed under the heading Not used.
13. In the Points box, enter how many points each selection is worth.
14. Repeat steps for each Selection Area created. When finished creating all the Selection Areas and matching them to a prompt, select Save.
Ordering
1. Select Ordering from the Type drop down menu.
2. The dialog window will automatically adjust to ordering format. Enter the question text.

3. Enter the answer choices and set the correct order.
4. Click Add Item to add another answer. Click Add Distractor to add an option that will not be used in the order.
5. The point value of the question can be edited in the Points column.
6. Provide generalized feedback for the question (optional). Select the desired feedback format from the Feedback drop down menu. Three types of feedback are possible for multiple response questions:
- Same for All: to enter one feedback entry that appears to students regardless of the answer they select.
- Correct/Incorrect: to enter two different feedback entries. The correct entry appears to students if they enter the correct answer and the incorrect entry appears to students if they enter an incorrect answer.
- Different for each: to enter separate feedback entries for each possible response. Students view the feedback entry according to how they responded to the question.
7. Check any additional options desired for the question.
- Make this question extra credit: Extra credit questions will not change the total points possible for the exam. Any questions marked as extra credit cannot negatively impact students' grades.
- Any response gets full credit: If selected, students who answer the question will receive full credit, even if they answered the question wrong. This is a helpful tool for awarding participation points.
- Add 'Explain your answer' box for this question: An 'Explain your answer' box will be provided to students when answering the question. Instructors can view explanations and change scores in the Scoring tab or the Grader.
- Prompt students to select __ answers: This will display how many answers should be ordered to the students.
- Scoring:
- Absolute position scoring: Answer choices must be in the exact answer spot to receive credit for that option.
- Relative position scoring: Answer choices that are placed after the correct previous answer will be correct. Answers placed after the incorrect previous answer will be wrong.
- Instructor graded: The instructor manually grades each answer.
- Display: Select if the choices will display vertically or horizontally.
8. Click Save.
Calculated
1. Select Calculated from the Type drop down menu.
2. The dialog window will automatically adjust to calculated format.

3. Follow steps 1-4:
Step one (optional): Enter text for Question Instructions
Step two: Create variables
- Name: Enter a name for a variable. Variables are case sensitive when added to calculated questions.
- Add Values: Click on the arrows to set the variable as a Range, List, Data Set, or Distribution. Assign values from the appropriate options.
- Range: Select Range from the possible values drop down. Enter the lowest possible range value in the left box and the highest possible value in the right box. Click on to choose between an Inclusive range and an Exclusive range and click add to add the range to the variable. Click on the "x" next to the Range to delete the it. Repeat the process to add multiple ranges.
- List: Select List, enter a value and click add. Repeat the process to add values to the list. Click on the "x" next to the List number to delete the number.
Note: The possible values for all variable types are non-unique, meaning a list variable could have multiple of the same possible value. For example, a list variable could have possible values of 0, 1, 2, 2, and 3, which just means that makes 2 twice as likely as the other numbers. - Data Set: Select data set and determine the number of sets and the number of values in each set. Enter values in the values box and click add. Click Edit Sets to make changes to the sets. Data Sets can include up to 30 sets with up to 30 values in each set. Click on the "x" next to the Set number to delete the Set.
- Distribution: Select Distribution, and choose Normal, Skew Normal, or Bimodal from the dropdown menu in the Possible Values column and enter the corresponding possible values for each distribution.
Note: Size is for each distribution is limited to 30. Click add to assign values to the distribution. You can include multiple distributions of different types for each variable.
- Precision: Define precision as Decimal Places or Significant Figures if desired.
- Add Variable: Click to enter additional variables, following the same steps.
Note: Variable names are required to start with a letter (lower or uppercase), followed by any combination of letters, numbers, or underscores.
Step three: Create question text for subquestions

5. Click on the edit icon to edit the subquestion, click on the copy icon to duplicate the question, or click on the trash icon to delete additional sub questions. Click on Add subquestion to add another question based on the same variables.
Note: The question name on the sub-question tabs are not visible to students and are purely for instructor reference.Step four: Create answer formula
- Select Insert variables drop down menu to enter the desired variable in the text box. Instructors can also type in the formula or function and Enclose variables between { } to identify them, even if they are defined as exclusive. If a variable is not referenced in the question text, then a student will not know the value assigned to that variable. Remember, variables are case sensitive.
7. Click on See all available math symbols and functions to display a list of these that are available in Learning Suite.
8. Enter the appropriate formula in the Answer text box. Click inside the green formula box to display the Insert Variable and Insert Function menu. Click on Insert variable to add a variable, or type {variable}.
9. Set the tolerance for acceptable responses as a number or percent from the dropdown menu and add points possible for the question and each sub question.
10. Leave feedback if desired by selecting Feedback on student answer.
11. Check any additional options desired for the question.
- Make this question extra credit: Extra credit questions will not change the total points possible for the exam. Any questions marked as extra credit cannot negatively impact students' grades.
- Any response gets full credit: If selected, students who answer the question will receive full credit, even if they answered the question wrong. This is a helpful tool for awarding participation points.
13. Click Save.
-
Toggle ItemQuestion Banks/Pools
Learning Suite includes Question Bank, which provides an easy way to store exam questions for use between courses and semesters. Questions are organized in question pools and subpools, or customizable collections of questions. Pools leave organizing the Question Bank up to the user. No limit exists for the number of pools that can be created.
Open the question bank in a course by clicking the Exams tab, then selecting the green Open question bank button.

Question Bank can also be opened by selecting it from the left-side menu on the Course List page.

Create a New Question Pool
1. Open the Question Bank and click Create New Pool.

2. A Create New Pool window will appear. The options include:
- Pool Name: Enter desired title.
- Parent Pool: Select which pool the questions to inherit from, or leave as default to make a new parent pool.
- Permissions: This will display who has permissions to access this new pool.
- Add User to Pool: Use either NetID or Course Lookup to add new users to the pool.
- Create Pool: Click when finished.

Note: These changes are not permanent and can be edited at any time.
Create a Subpool
1. In the Question Bank, click the question pool that will be the parent pool for the subpool.

2. Click Create New Subpool and a dialog window will appear. Ensure that the Parent Pool is correct and continue with setup.

Import questions to question bank
1. In the Question Bank, click Import Questions(s) at the top of the page.
2. The Import questions window will open.

The options include:
- From LS Course, From LS Community, or From QTI/Moodle File: Instructors can draw Exams from these three locations. Select which source to draw from for the exam(s).
- Term: Select the term that the desired exams are found.
- Teaching Area: Select the correct Teaching Area.
- Course: Select the correct Course.
- Instructor: Select the correct instructor of the Course.
- Note: The instructor that owns the exam has to allow their exams to be copied in their Learning Suite Course setup.
- Exam: Select the exam(s) that contain the desired questions to be imported. Select more than one exam by checking the checkboxes next to all desired exams.
- Import to: Select the location within the Question Bank for the questions to be imported to from the dropdown menu.
- Preview: When finished, click Preview.
Note: It is important to understand the difference between importing questions as a new copy or maintaining the link between the statistics and questions. Importing questions as a new copy means that any statistics associated with the selected questions will not be associated with the questions in the question pool. If the link is maintained between the statistics and the questions, the statistics will be available within Exams and the Question Bank and will update as those questions are used in future exams.
3. Two possible options are available when importing questions:
Option #1: Option to maintain link between statistics and questions. Use this view if:
- The instructor is the owner of the question pool that the questions originated from or the instructor was shared the question pool that the questions originated from.
- The questions came from a Learning Suite exam and are also not from a question pool within a Question Bank.
Check the boxes next to the desired questions to be imported. Learning Suite will import questions and their statistics by default, but the option is available to import the question as a new copy, i.e. there are no statistics linked to the question. A Select All option and Import all as new copies option are available at the top of the dialog window.
Option #2: Option to only import as new copy. Use this view if:
- The instructor is not the owner of the Question Bank that the original questions originated from or the instructor was not shared the question pool that the questions originated from.
4. Check the boxes next to the desired questions to be imported. A Select All option is available at the top of the dialog window.
5. Click Import. A green banner will confirm the import of the questions selected.
Add Questions to Question Bank
1. In the Question Bank, select the question pool to add questions to, then select Add new question.

2. The question creation dialog window will appear. Creating the questions is the same as creating them in an exam.
Sharing with other users
In the Question Bank, an instructor can either create a new pool or select the edit icon to edit an existing pool to share the pool with an user or teaching area.
To Share a Pool with Instructor(s):
1. In the Edit Pool Details dialog window, enter either the name or NetID to search for the instructor to share the pool with.

2. After entering the NetID of the instructor, select the dropdown menu that reads Can view by default. From the dropdown, select the permission level this instructor should have (see below for explanation on the permission levels).
Each permission level also has all the permissions of all the levels below them.
- Can view: User can view and use the pool and its questions.
- Can add/edit/delete: User can view, use, add, and edit the pool and its questions.
- Make co-owner: Co-owners have all the rights associated with the “Can add/edit/delete” permissions. Co-owners also can add or edit user permissions for the pool.
- Make owner: Owners have all the rights associated with co-owners, but the pool is under their ownership in the Question Bank.
3. When satisfied with the additions, click Save Pool.
To Share a Pool with Teaching Area(s):
1. In the Edit Pool Details dialog window, click the arrow on the Select Teaching Area dropdown.

2. After selecting the desired teaching area, either select a specific course from that teaching area or leave it in its default state to allow all courses access in that teaching area. Select the permissions that area will have.
3. When finished, click Share to finish adding, and then click Save Pool.
Move questions between pools
1. In the Question Bank, click the question pool that contains the question(s) to move.
2. Left click the mouse and hold over the question to pick it up, then drag the mouse over the name of the pool to transfer the question.
Edit/Copy/Delete Pool
To Edit:
Open the Question Bank and click the edit icon next to the question pool title to edit.
To Copy:
Once in the Question Bank, click the Copy icon next to the desired pool to copy. The copy dialog window will open. Select a location, and enter the name of the new pool. If desired, check the box to also copy sub-pools. When finished, click Copy Pool.

To Delete:
Once in the Question Bank, click the title of the desired pool in order to expand it. Click the delete icon. A dialog window will ask for confirmation. Click Yes.
View/Restore Deleted Pools
View Deleted Pools:
Once in the Question Bank, click Deleted Pools on the left-side menu.

Pools that have been deleted will appear in the window. Clicking the number of quesitons will show the questions associated with that pool. Now there are two options:
- To Restore deleted question pools, check the boxes of pools to restore and click Restore in the top right corner. A dialog window will appear. Select the desired location within the Question Bank from the dropdown menu. Click Restore.
- To delete pools forever, check the boxes of question pools to delete forever. A Check all option is also available at the top of the window if desired. Click the Delete Forever button at the top right of the window. A confirmation window will appear. Click Continue.
Add a question bank question to an exam
1. Under Exams, click the title of the desired exam to open the exam editor, then click Save and go to questions. Or, click the Edit Questions icon to the right of the exam title on the Exams page.
2. On the Questions page, click the Add from Question Bank button.
3. The Question Bank window will open. Open a pool by clicking its title in the left-side menu, then check the boxes for the desired question(s). A Check all option is also available at the top of the window to select all questions in the opened pool.

4. Selected questions will appear in the Question Queue. Remove them by deselecting the question(s). Click the Add to Exam button when finished.
Switch between edit and exam mode
The Edit Mode allows questions and question pools to be created, edited, or deleted. The Exam Mode allows questions to be selected and added to an Exam. These modes are only available after selecting Add from Question Bank on the Questions page of an exam.
1. Under Exams, click the title of the desired exam to open the exam editor, then click Save and go to questions. Or, click the Edit Questions icon to the right of the exam title on the Exams page.
2. Click the Add from Question Bank button on the Questions page.
3. The Question Bank window will open. Click Switch to Edit Mode in the top-left of the window to change to the exam mode window. Switch to Exam Mode can be clicked to switch back.

Add random sample from question bank
1. Under Exams, click the title of the desired exam to open the exam editor, then click Save and go to questions. Or, click the Edit Questions icon to the right of the exam title on the Exams page.
2. On the Questions page, click the Add from Question Bank button.
3. The Question Bank page will open. Open a pool by clicking its title in the left-side menu, then click Random Sample at the top of the questions list.

4. The Random Sample dialog window will open. It has two tabs: Simple and Advanced.

- Within the Simple tab, simply select the number of desired questions to be randomly drawn from the pool.
Within the Advanced tab, select a Question difficulty from the dropdown menu. Select the number of desired questions.
Note: Question difficulty is drawn from statistics associated with the questions.
5. When finished, click the View Sample button. The randomized questions will be displayed for review. Questions can be Removed or Removed & Replaced, and Learning Suite will select another random question from the pool. When finished, click Add to Queue.
6. The questions will be added to the Question Queue. When finished adding questions, click Add to Exam.
View Question statistics and/or Edit question(s) in Question Bank
1. For Statistics, click the pool title that contains the desired question to view.
2. Click View Details at the bottom right of the question, and a Question Details window will open.

3. The Statistics tab is viewable by default. The following information describes what difficulty and discrimination mean:
Item Difficulty:
- Item difficulty values represent the proportion (p-values) of students who answered the item correctly. For items written based on student-learning outcomes, it is possible and even desirable for a high proportion of students answer those items correctly (for example, p-values between 0.80 and 1.0). Such p-values can provide evidence of students achieving those outcomes.
- In Learning Suite, here are the guidelines:
- Very Hard < 0.15 (Too few students answered this question correctly. Possibly miss-keyed.)
- Hard = 0.35-.59 (There may be some confusion in the wording of the question or the students’ learning regarding this topic. Up to 40% of students answered this question incorrectly.)
- Moderate = .60-.89 (Most students answered this question correctly.)
- Easy = 0.90-.99 (Almost all students answered this question correctly.)
Very Easy = 100 (All students answered this question correctly.)
Note: Except for very extreme difficulty values (p-value < 0.25), where the answer key may be wrong, the instructor should evaluate and judge item difficulty based on the content and the purpose of each question.
- In Learning Suite, here are the guidelines:
Item Discrimination
- The term “discrimination,” in this context, is the recognizing and understanding of the difference between students who perform well on the exam and those who do not perform as well. The statistic is a point-biserial correlation on each exam question, based on the performance of the high and low scoring groups of students.
- For criterion-referenced exams, item discrimination may not be a strong measure of the effectiveness of a given exam question. This is due to the fact that criterion-referenced questions are generally mapped to learning outcomes. Students who are engaged in their learning show achievement of those outcomes by answering such questions correctly.
- Item discrimination is generally used to evaluate questions designed for norm-referenced exams, where students are ranked on a comparative distribution of scores.
- In Learning Suite, here are the guidelines:
- Very Bad = -.6 to -.2
- Bad = -.2 to 0
- (Negative-discrimination values indicate that more lower-scoring students are answering this question correctly than the higher-scoring students. This question should be examined to see how it is confusing the higher-scoring students.)
- Moderate = 0.1 to .5 (The difference in performance on this item between the higher-scoring and lower-scoring students is small.)
- Good = .6-.9
- Very Good = 1
- (For these items, there is a distinct difference in the performance between the higher and lower-scoring students. The closer the statistic is to 1.0, the stronger the discrimination is between the two groups.)
- In Learning Suite, here are the guidelines:
4. In the same Questions Details window, click the Question tab to edit a question in a pool.

5. When edits have been completed,
click either Save as new version or Save.
- Save as new version will create a new copy of the question that exists without previous statistics and can be found under the Previous Versions portion of the Question Bank.
- Save will create a version of the question but without previous statistics.
View/copy previous version of a question
To view the previous version of a question, click Previous Versions at the bottom left of the desired question.
To copy the previous version, click the Copy icon at the top right of the previous version. A dialog window will open. Two options are available:
- Selecting Copy as new version will create a new copy of the question that exists without previous statistics and can be found under the Previous Versions portion of the Question Bank.
- Selecting Copy as new question will create a new copy of the question that exists without previous statistics. This copy can be found as an independent question within the question pool that the original question was found.
6. When finished, click OK. A green banner at the top of Learning Suite will confirm that the previous version is now the current version.
Delete a question bank question
Once in the desired question pool, click the delete icon next to the question. A confirmation dialog window will appear. Click Delete.
View/restore question bank questions
Open the pool that contains the deleted questions. Click the Deleted Questions text at the bottom of the expanded pool menu.
Note: Deleted Questions will not appear if no questions have been deleted from that pool.
This portion of Learning Suite allows two options regarding Question Bank questions:
- Restore: The question will be moved from Deleted Questions.
- Check the boxes associated with the desired questions to restore. A Check all option is available at the top of the window if desired.
- Click the Restore button at the top right of the window.
- A confirmation dialog window will appear. Click Continue.
- Delete Forever: Deleting questions forever will cause them to no longer be available to restore to the Question Bank.
- Check the boxes associated with the desired questions to delete forever. A Check all option is available at the top of the window if desired.
- Click the Delete Forever button at the top right of the window.
- A confirmation dialog window will appear. Click Continue.
View pools shared with you 1.
Once the Question Bank is open, click Shared With Me in the pool navigation menu on the left. The pools that have been shared will appear below the header.
2. To view the permissions given, click the edit icon next to the pool.
3. The Edit Pool Details window will open. Depending on the permissions, the user can change the pool information or simply view it.
-
Toggle ItemQuestion Blocks
Instructors can choose to use Questions Blocks when creating exams on the Exam Questions Page. Question Blocks are groupings of questions within exams. Questions Blocks are named and can have descriptions, allowing for detailed organization of exams. Additionally, Question Blocks can be linked to Learning Outcomes. There are 3 types of Question Blocks: Regular, Dynamic and X of Y.
Regular Question Blocks
Regular Question Blocks provide a general way to organize questions in exams by creating groupings of questions. When created, a Regular Question Block has a beginning and an end horizontal bar. Questions can be created directly inside the block, questions can be added directly into the block from the Question Bank, or questions can be dragged into the block from outside it.
1. Under Exams on the Exam List page, click the Questions page icon for the desired exam to navigate to that exam’s Questions Page.
2. Click New block located at the top of the block of questions or between each question when clicking the + icon.

3. Add a Title.
4. Add a Description (Optional).
5. Select any Settings (Optional).
Note: Do NOT select the Settings Dynamic Question Block or Score X of Y if you wish to create a standard question block.
6. Click the dropdown next to Default Learning Outcome to select any desired Learning Outcomes to link to the block (Optional).

7. Click Save when all desired settings are applied.

8. Add questions to the block:
a. Add questions directly in the block:
i. Click + located in between the beginning and end of the question block to open up a new Question Button Menu
ii. On this menu, Press New question to create a new question or Add from Question Bank to add questions from Question Pools in the Question Bankb. Drag questions into the block:
i. Click and hold on the white space of the desired question
ii. Drag the question until the green bar is located inside the block
iii. Release the click to drop the question in the blockDynamic Question Blocks
Dynamic Question Blocks randomly select a designated number of questions from a selected Question Pool from the Question Bank. Dynamic Question Blocks can only use questions in a Question Pool, no questions on the Exam’s Question page can be added to the block like with Regular Question Blocks.
1. Under Exams on the Exam List page, click ?’s for the desired exam to navigate to that exam’s Questions Page.
2. Click New block located at the bottom of the page.

3. Add a Title.
4. Add a Description (Optional).
5. Click the dropdown next to Default Learning Outcome to select any desired Learning.
6. Outcomes to link to the block (Optional).
7. Check the checkbox for Dynamic Question Block.
8. Select any other Settings (Optional).
9. Click the dropdown to the right of from pool to open a list of Question Pools from the Question Bank.
10. Select the desired pool.
11. Input the number of questions for the block to use.
12. Input the desired Total Scaled Points for the block.

13. Click Save when all desired settings are applied.

Notes:
- Questions will be selected ONLY from the chosen pool (or sub pool) and will NOT include questions in any sub-pools associated with the selected pool.
- The Compound question types (fill-in-the-blank, matching, hotspot, ordering, and calculated questions) — those which have multiple scored items within the same question — are NOT allowed in Dynamic Question Blocks. Any Question Pool selected for a Dynamic Question Block that has any compound question type will not draw upon those questions. Additionally, selecting a Question Pool that only contains compound questions types is prohibited.
- A question pool or sub-pool can be used in only one dynamic block per exam; similarly, a dynamic question block can pull from only one pool or sub-pool.
X of Y Question Blocks
X of Y Question Blocks are similar to regular question blocks. X of Y Question Blocks provide a way to organize questions in exams by creating groupings of questions, along with additional functionality. When created, an X of Y Question Block has a beginning and an end horizontal bar. Questions can be created directly inside the block, questions can be added directly into the block from the Question Bank, or questions can be dragged into the block from outside it. Additionally, X of Y Questions Blocks only grade a designated number of questions that are in its block.
1. Under Exams on the Exam List page, click ?’s for the desired exam to navigate to that exam’s Questions Page.
2. Click New block located at the bottom of the page.

3. Add a Title.
4. Add a Description (Optional).
5. Click the dropdown next to Default Learning Outcome to select any desired Learning.
6. Outcomes to link to the block (Optional).
7. Check the checkbox for Score X of Y.
8. Select any other Settings (Optional).
9. Input the number of questions to be graded in the block.
10. Input the desired Total Scaled Points for the block.

11. Click Save when all desired settings are applied.

12. Add questions to the block:
a. Add questions directly in the block:
i. Click + located in between the beginning and end of the question block to open up a new Question Button Menu
ii. On this menu, click New question to create a new question or Add from Question Bank to add questions from Question Pools in the Question Bankb. Drag questions into the block
i. Click and hold on the white space of the desired question
ii. Drag the question until the green bar is located inside the block
iii. Release the click to drop the question in the blockNote: The Compound question types (fill-in-the-blank, matching, hotspot, and calculated questions) — those which have multiple scored items within the same question — are NOT allowed in X of Y Question Blocks. When creating a question inside an X of Y Question Block, the compound question types will not appear on the dropdown of question types that can be created. Compound question types cannot be dragged into X of Y Question Blocks. When adding questions from a Question Pool in the Question Bank, compound question types cannot be selected and will not be added to the Question Queue and therefore will not be added into the block.
Additional Settings
- Randomize question order within this block.
- The order of the questions in the block will be randomized for each Student's exam.
- Available for Regular and X of Y blocks

- Restart question numbering.
- The numbering of the questions in the block will begin again at 1, counting onwards.
- Available for Regular, Dynamic and X of Y blocks

-
Toggle ItemReordering Questions and Blocks
Exam questions can be reordered in four ways:
1. By dragging and dropping the questions to a different location.
Click anywhere on a question and drag it to the new location.

Question numbers automatically adjust after questions are placed.
Questions can be moved in and out of question blocks following the same procedure.
2. By editing the number of the questions directly using the text box that houses the question number.

The question will automatically move and the rest of the questions will be renumbered as needed upon hitting Enter or by clicking anywhere outside of the text box.
3. By utilizing the move arrows associate with each question number.

While hovering over the question number, arrows will appear that allow you to click the question up or down in numerical order in your exam.
The question numbers in the exam will automatically reorder according to where the question is moved.
4. In the Organize tab.
Click the Organize tab on the exam questions page. A popup dialog box appears with all the question numbers and blocks displayed at once.

In the Organize popup, questions and blocks can either by moved by clicking and dragging, or by simply clicking once on the question to activate the move arrows like such:

Once you have made all the changes you wish in Organize mode, click Save.
-
Toggle ItemImport/Export Questions in an Exam
The instructor can import questions into an exam or export questions from an exam.
Import Questions
1. Open the Exam by clicking the Exam questions icon in the Exam List or click Save and go to Questions when creating an exam.

2. Click Import questions in either of its locations.

3. Instructors can import questions that are in the format of Moodle XML or QTI version 2.1 XML. Click Choose File and select the file from the device’s finder.

4. Then click Import. The questions will appear in the exam. Review the questions to ensure the questions and answers imported correctly.
Note: Questions can also be imported from a Question Bank. Click the Question Banks/Pools section below for more information.
Export Questions in an Exam
1. Click Export questions.

2. Select to export all questions or choose individual questions or to export the question(s) to Moodle XML or QTI version 2.1 format. Click Export. The file will then be downloaded to the instructor’s computer.. Click Next.

-
Toggle ItemPreview/Take an Exam
Instructors cannot take exams for specific students. However, they may take an exam in general student view.
To take an exam in student view:
- Go to Exams.
- When in the Exam List, select Go to Student View in the top right corner.
- From the Exam List, click View for the exam you wish to take.

Note: By default, instructors will see exactly what the students will including time limit, attempts, and status. Beginning the exam from here will enforce all options created for students. To take the exam without those specific options, click View Page as Instructor. This view will give instructors unlimited attempts and an hour time limit by default, regardless of how long and what date the exam is scheduled for students. (If there is no time limit, the instructor will also have no time limit) This is a feature which allows instructors multiple attempts so they can design the exam to fit their expectations. Students will be given the exam based upon how the instructor scheduled it (date, time, time limit, etc).

4. Then click on Begin Exam.

This will ONLY be available for exams that are published. This is because students cannot view unpublished exams. The results of this test run can be found in the Results tab (in Instructor View) and will be listed under the instructor's name. The instructor's score will not be pushed to BYU Grades, since it is merely for testing purposes.
Note: When professors/TAs take an exam in Student View, often an exception is created for them and they may see their name in the list of exceptions for the exam, but this is nothing to worry about.
- Go to Exams.